Tutorial: Debugging Android Accessibility

Accessibility, making your product available to anyone, is a key part of designing user experience. Designing and building for accessibility can help build a larger user base, a broader product, and answer questions you didn’t even know you had.
At Uncorked, we develop products for big companies that have stringent mobile accessibility standards. Every time we go through an accessibility audit, we learn where we can improve our process and inch closer to the goal of considering accessibility throughout the design and development processes.
I recently stumbled across an Android accessibility documentation page that I had, embarrassingly, ignored: Using Node Tree Debugging. This doc is a great walkthrough, but there is a whole bundle of information that spills out into your terminal with limited explanation of what it all means. In order to sort it all out, I dug into the TalkBack GitHub repository and tested out a bunch of stuff. While mapping it out, I realized I should share this information as an extension of the doc linked above.
Here’s what we’ll be working through:
- Turning on and configuring settings
- Interpreting the output
But first, why this is useful…
Debugging accessibility in Android can be tricky. The documentation is lacking, the open source code is at least one release version behind, and perhaps worst of all, the majority of StackOverflow answers lead to explicitly inaccessible choices.
For example, the first listing that pops up when Googling “android accessibility recyclerview” advises a StackOverflow user to set the RecyclerView importantForAccessibility attribute to “no”. (This will not make your app more accessible).
Here’s the crux of the issue: many developers don’t to know the difference between something that “fixes the problem” and something that makes their app inaccessible. In attempting to make a quick fix, we eliminate our ability to make an accessible choice. So, consider this an intervention.
Let’s role play for a second to give ourselves an example of making a choice that promotes accessibility. I’ve recently been having trouble with a parent (lol, devJokes). It’s a ScrollView and its focus is taking partial precedence over its children when the children are directly selected, as opposed to the Explore By Touch or Linear Navigation modes. I haven’t yet figured out if this is a bug in TalkBack, the most popular assistive technology in the Android toolkit, or if it’s something I can or should fix. However, I did find a useful tool that helped me understand it was the ScrollView, and not a different parent view, talking over its descendants.
There are many things I’ve struggled to understand about TalkBack, such as how it detects views, and their hierarchy of importance. TalkBack has a different view tree than the app layouts, so using things like “Show layout bounds” in Developer Tools is limited. There isn’t a lot of information relevant to an AccessibilityService.
But guess what? Node tree debugging shows you what TalkBack is interpreting and helps demystify the missing information.
Full disclosure: I mainly followed the Android documentation for Using Node Tree Debugging and messed around with it in different apps that our clients have previously published. This developer setting seems to only be accessible through TalkBack, but I believe the same node tree should be relevant across various assistive technologies.
So, let’s get started!
Turn on Node Tree Debugging
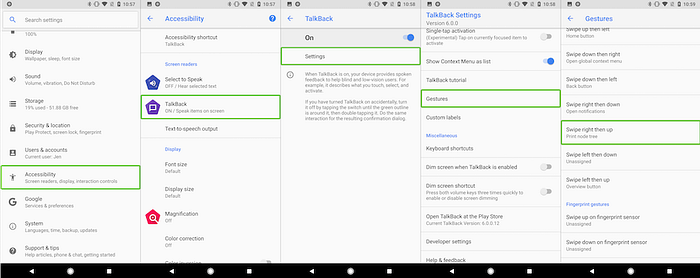
To start, turn on node tree debugging. Here are some screen caps, if you don’t know where these menu items are:
Steps 1 & 2
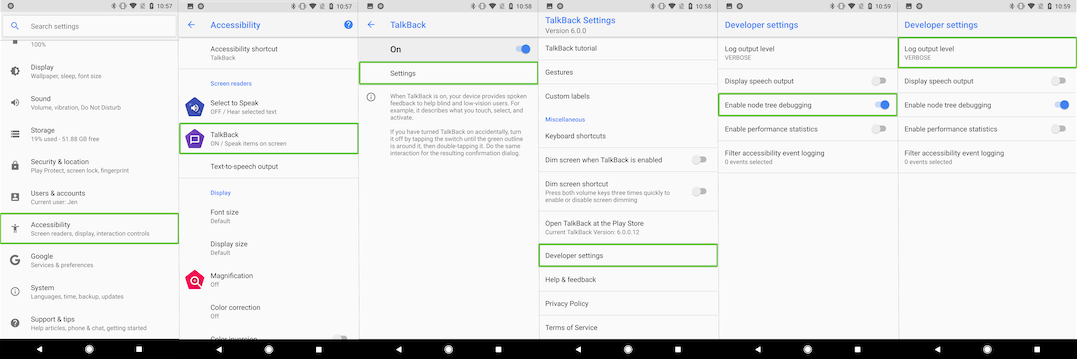
Step 3
Step 4: Turn on TalkBack
(If you don’t know how to use TalkBack yet, hold off on this one for now, because you’ll probably get annoyed. Read on).
Pause: Learn how to navigate using TalkBack
I’ve been operating under the assumption that you’ve used TalkBack. If you haven’t used it, you should go through the in-app TalkBack tutorial before moving to on to debugging. It can be found here:
Once you’ve familiarized yourself with navigation in TalkBack, you might want to avoid turning on TalkBack until you’ve navigated to the view you’re debugging, especially if you’re new to accessibility or TalkBack. When I’m using TalkBack, I keep the System Settings open to TalkBack and available through the overview menu so I can easily turn it off when I’m done. Here are some other shortcuts to turn it on and off.
Get node debugging info and interpret it
- Open your terminal or console window and navigate to adb in your platform-tools directory (on my machine it’s ~/Library/Android/sdk/platform-tools/).
- Turn on TalkBack.
- Navigate to the view you’d like to debug.
- Type
adb logcat TreeDebug *:Sinto your terminal window to connect your device and your console. - Use the Gesture you assigned for debugging.
You should get a bunch of logs in your terminal window that look something like this (I got rid of timestamps and unnecessary stuff for readability):
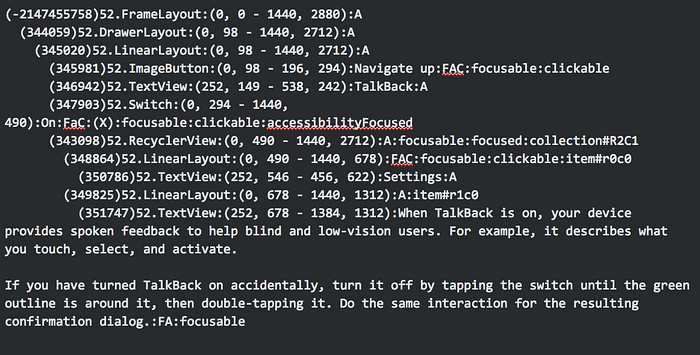
Handily enough, the view hierarchies are formatted with tabbing, so it’s pretty clear which views are nested in which tree.
Here are the relevant pieces of information provided for each view:
Invisibility
- If a view is not visible to the user, and yet it exists in the node tree, it is marked
:invisible:, like this:(681431)113.Switch:invisible:(2656, 1852-1440, 2020):ON:FAC:(X):focusable:clickable - Visible views are not marked.
Bounds
- The second set of parentheses contains coordinates of the view in relation to the top and start (left) edges of the screen, followed by the width and height of the view, measured in pixels.
- Like this:
(37457)9.TextView:(252, 546–456, 622):Settings:A - This view starts 252 pixels from the start of the screen and 546 pixels from the top. It is 456 pixels wide and 622 pixels tall.
Visible text and content description
- Visible text is followed by content descriptions, and separated with colons.
- Like this:
(78821)50.Button:(1071, 1457–1305, 1646):GOT IT:Got it:FAC:focusable:clickable - Because TalkBack sometimes detects capitalized letters as acronyms, this is an instance of why you might want to have both visible text and a content description. (In this case, TalkBack reads out “Got I.T.”)
- Other reasons to put both visible text and a content description might be if you have line breaks for visible text and don’t want a pause in TalkBack’s reading of the text.
- ON/OFF: for some reason the state of a switch (ON/OFF) appears to be appended to the content description, which explains some behavior that I’ve seen, but is not verifiable in TalkBack’s open source repo. This might be a default content description for switches. If you know, please tell me!
Action Flags
- Codes for actions available to the view. See the table below.
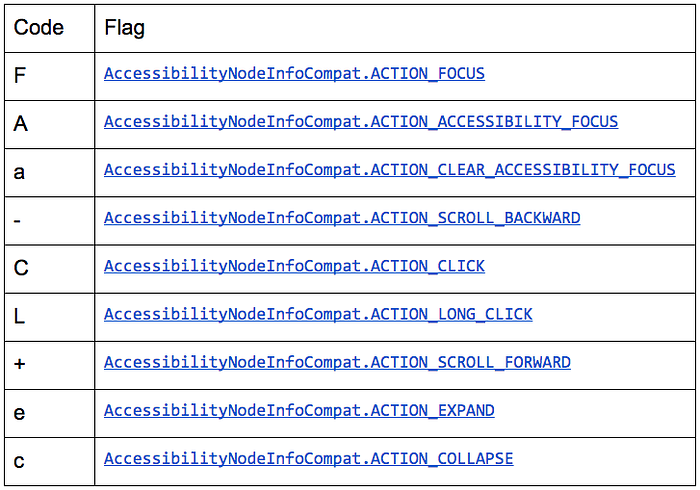
- CLEAR_ACCESSIBILITY_FOCUS is only available for the view that is accessibilityFocused (see State Information below).
- For example:
(32652)9.ImageButton:(0, 98–196, 294):Navigate up:FAC:focusable:clickable - This view has focus, accessibility focus, and click actions available
Checked State
- Shows the checked state of checkable views. This is relevant for CompoundButton views and its subclasses.
- For example:
(74980)53.Switch:(1218, 1615–1384, 1710):OFF:A:( )
Or:(64409)53.Switch:(1218, 1108–1384, 1203):ON:A:(X)
State Information
- View state information: including
:focusable:,:focused:,:selected:,:clickable:,:longClickable:,:accessibilityFocused:, and:disabled:
These are all self-explanatory, except perhaps focused and accessibilityFocused. These two distinguish between which view is currently in focus through an accessibility service, and in focus for things like keyboards, which is defined for all users. - For example, the LinearLayout below has a TextView nested within it. What this tells us is that the focus and click actions are set for the parent LinearLayout view, and apply to its child TextView.
(35535)9.LinearLayout:(0, 490–1440, 678):FAC:focusable:clickable
    (37457)9.TextView:(252, 546–456, 622):Settings:A
Collection Information
- Finally, and most interesting to me, (because I didn’t understand how TalkBack was organizing this information), is the collection-based classes (e.g., RecyclerView), which are shown in the column and row count.
- Children of those classes will also include the position in the view by column and row.
For example:
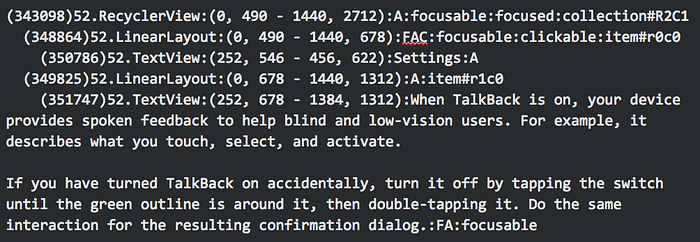
- Here the RecyclerView is annotated at the end with
collection#R2C1, which tells us that there are 2 rows and 1 column in the collection. - Here the two child view items in the collection, two LinearLayouts, are annotated with
item#r0c0anditem#r1c0. The positions start at 0, so these tell us that the first child is positioned at row 1, column 1, and the second is positioned at row 2, column 1.
So, there you go. Happy debugging! If you’re looking for resources to help you fix something, check out AccessibilityManager and AccessibilityEvent. Share the fixes you come up with or if you need help.
Some things I haven’t tested
I haven’t yet tested customized focus order, Coordinator layouts, or Custom Views. Some of what I wrote here is in the documentation, but I figured out a lot of it by digging through the TalkBack GitHub repo and running the command on different apps.
Overall, TreeDebug is a useful tool that has helped me figure some TalkBack things that I’ve been scratching my head about for a while.
Uncorked Studios recently announced a collaboration with Autodesk and the Portland Incubator Experiment to create a manufacturing and prototyping focused incubator in Portland, OR. For more information, check out the story from our CEO, Marcelino, here.
